Bicycle tyres and tubes – fitting, issues and caveats
by Jan | April 24, 2020 1:45 pm
Without any doubt, replacing standard bicycle tyres and tubes is the most frequent task, it is done so often that I am keen to believe that every single bike has either tube or tyre replaced in a year, if not as single job then as a part of bigger repair. It seems to be so simple – just throw the tube inside the tyre and pry both onto the rim, inflate, fit the wheel back to the bike and you are ready for ride. But is it really that straightforward?
Standard tyres (I am not talking about tubs nor other less commonly used fitting systems here) are pretty safe and reliable even if the cheapest ones are involved. Nevertheless their reliability largely depends on keeping the fitting procedure, and following use, within certain boundaries.
Tyre/tube assembly forms the link connecting the whole bicycle to the surface you are riding on, transferring steering and braking forces, therefore a damaged tyre is a safety issue. Tyres can get damaged for various reasons, the most common ones are riding with under-inflated tyre, damaged or untrue wheel, and maladjusted rim brake.
The common part
Remove the wheel
The removal and refitting procedure is not a part of this article as it varies from bike to bike. I can note here just as a precaution – do not loose any washers, nuts, bolts, fittings, etc. and make note how they were fitted. Expect the whole process to be more complicated if following parts and accessories are fitted (with the last option being a time killer when it comes to rear tyre or tube replacement):
-
-
- Front/rear hub brake (excl. disc brakes)
- Front/rear hub dynamo
- Rear multi-speed hub
- Front basket support
- Chain tensioners
- Full chain-guard
- All of the above!
-
Deflate the tube if not flat already and remove the tyre
You can deflate the tyre by opening the valve, letting the air escape. If you are replacing the tube which uses the presta valve, you can actually brake the valve off, either using pliers or just by hand – my favourite method. Then start pressing the tyre side-walls away from the rim first, on both sides, progressing around the wheel. Then you can lift the tyre bead over the edge of the rim. Pressing the tyre beads together on the opposite side of the wheel helps often with seemingly stubborn tyres. Mostly there is no need for extensive use of tyre levers, use them just to lift the tyre in case you are not able to do it with bare hands. Using tyre levers sparsely means less possible damage to the rim, the tyre and the tube.
Check the tyre and tube, replace, refit onto the rim
Check the tyre for any foreign objects (thorns, pieces of glass, nails, pins, etc.) and the rim for sharp edges. Make sure the correct rim tape is fitted and is covering the nipples or holes fully. Replace damaged or worn tyre, replace or fix the tube and fit them back onto the rim (previous information about using tyre levers applies here as well), seat the valve in, inflate it little bit and check if the tyre is seated properly all the way round. If OK then inflate the tyre to the final pressure, following the information on the tyre sidewall. If the information is not visible, you can check this pressure table.
Refit the wheel
Depending on circumstances you may need to refit and adjust other parts like chain-guard, gear cable, brake cable, etc. Check that the wheel is fitted properly using ALL the fittings, removed in the first step, in correct order.
So, you have read the basics above, lets go ahead with the possible issues…
Pinching (using wrong tools, badly fitted)
This is the common problem when someone tries to fit tube that is wider than the inside of the tyre or the tube that has incorrect diameter. The tube gets trapped in between the tyre edge and the rim, as the inner diameter of the tyre is matching the outer diameter of the rim’s bead (not always – see Tyre/rim diameter issues) inflating causes the tyre is pushed onto the rim’s bead which results in the tube being pinched. If the pinching does not occur instantly it will wait there until the pressure increases due to weather, riding (yes, during the ride the pressure rises as the tyre and tube are flexible and deform continuously throughout every revolution – deformation means inter-material friction which generates heat), braking (in case of rim brakes – friction again), or a pothole (increases the pressure suddenly – the resulting damage can be easily confused with snake-bites though).
Another reasons for pinching include:
- using the correct tools wrongly (forcing the tyre onto the rim or getting the tube pinched in between the rim and tyre lever)
- using wrong tools (flat screwdriver or basically anything strong enough to serve as a lever)
Under-inflating (snake-bites, snapped-off valve)
Riding bicycle with the tyres under-inflated is the most common reason for tube punctures and early tyre wear these days. With the exception for the bikes in storage or transport, tyres should be always kept correctly inflated – they usually have correct inflation pressure marked on the side-wall. Many people just take the correctly inflated tyre as a constant, being convinced that once the tyre loses the pressure completely they must have got a puncture. The fact is that tubes are not perfectly air-tight and need pressure corrections time from time, this being at least every month.
The pressure is also slightly affected by outside temperature, tyres inflated to correct pressure in summer with ambient temperature of 30°C may not be inflated correctly when temperature drops below 0°C, even if the tubes were hypothetically impermeable. Generally, using Gay-Lussac’s Law describing how the pressure in a fixed volume container depends on the temperature, pressure1 over temperature1 equals pressure2 over temperature2, or p1 / T1 = p2 / T2. From this we get p2 = (T2 × p1 ) / T1. Just a note, if we want to work with temperatures below zero, we need to convert both T1 and T2 to kelvins, adding 273.15 to both of them!
For an idea how it works lets have a tyre, inflated to 45PSI at 35°C, taken to 5°C. Then the pressure will be p2 = (45 × 5) / 35, which is just over 40PSI, which is about 10% pressure drop. Obviously, the tyres allow for some expansion so they are not exactly a “fixed volume container”, nevertheless narrower the tyre is the outcome gets more precise.
Tyres and tubes run at low pressure show various spectrum of damages, ranging from slow punctures to those causing sudden loss of air and control. What is usually visible from outside are cracks in side-walls running on both sides roughly in the middle of the tyre height. The cracks are better recognizable when the tyre is pressed towards the rim since they develop in that way. Especially on good quality skin-wall tyres the cracks follow the cords and resemble either slash or a letter X. If the tyre has been run under-inflated for longer time, the casing cords break, allowing tube to burst through the tyre when pressure increases (when it is getting inflated eventually, the wheel is exposed to higher temperatures during the summer, etc.).
Quite often the first sign of breaking cords is that it feels like riding buckled wheel but when you investigate such suspicion you find the wheel is in good shape – the cord is giving up allowing the wheel float sideways just under the load.
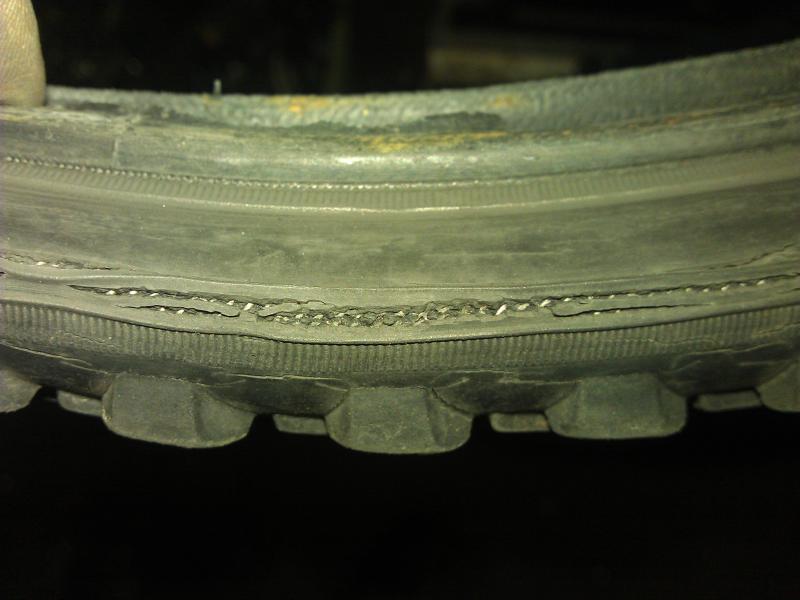 A gum-wall tyre often run under-inflated A gum-wall tyre often run under-inflated |
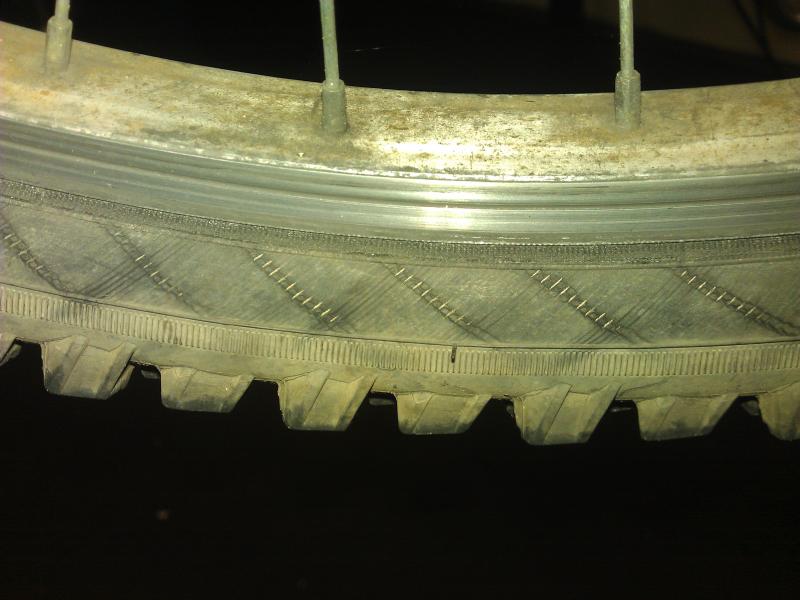 A skin-wall tyre often run under-inflated A skin-wall tyre often run under-inflated |
What is not visible are damages done to the tube inside – tyre and tube are supposed to flex together, without any mutual movement. When the pressure is not high enough to keep the tube tightly pressed against tyre and rim, the tube moves differently than the tyre, causing abrasion of both, and you can find loose rubber bits on outside of the tube and/or inside the tyre.
The abrasion reduces tube wall thickness and eventually leads to slow puncture, patching the tube will not help as inflating the tyre to correct pressure makes the tube tear apart at many places (the ridges in the picture below, on the right) making replacement inevitable.
Also, as the tyre is not pressed against the rim, it can move alongside when you pedal hard or apply the brakes, shearing the valve off. That will leave you with a flat tyre instantly!
 A tube showing damage caused by under-inflating A tube showing damage caused by under-inflating |
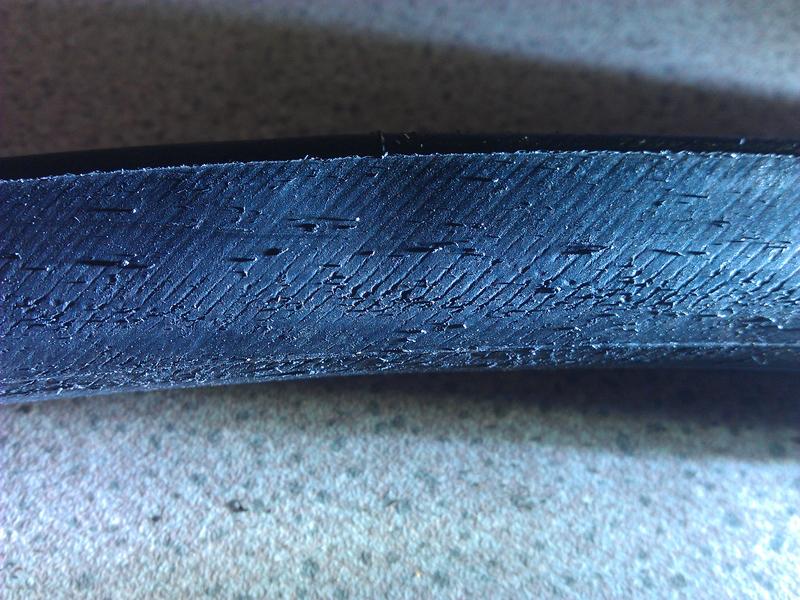 Detail showing abraded surface and loose rubber bits Detail showing abraded surface and loose rubber bits |
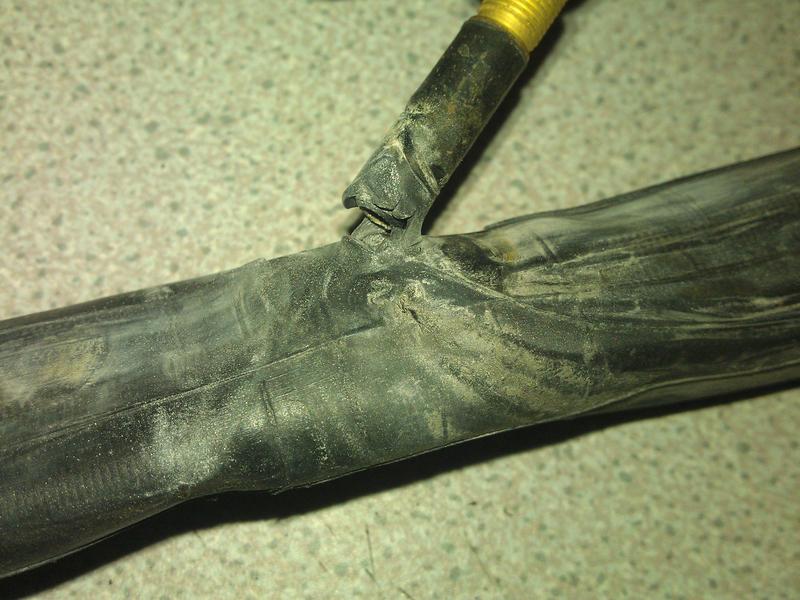 Valve sheared off Valve sheared off |
Over-inflating (tearing the tyre, damaging rims)
In previous section we saw what can happen when tyre is run under-inflated, now I will show you what could happen when maximum pressure markings are not observed. The following pictures were taken after customer brought in a supposedly punctured bike, the maximum inflation pressure marked on side-wall was very low, about 30PSI which is unusual for a given size (40-559 or 26×1.6), suggesting that the tyre was of a very low quality with only 30-40TPI cords. Inflating such tyre to usual 65PSI, which would be absolutely normal for standard quality tyres of this size, helped to kill the tyre in weeks.
 Tyre torn by over-inflating Tyre torn by over-inflating |
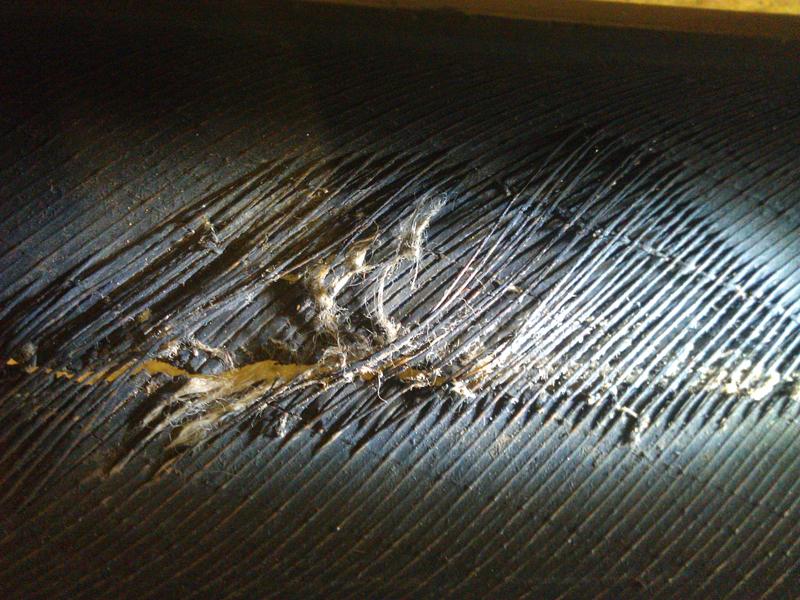 Torn tyre – detail from inside Torn tyre – detail from inside |
 Burst tube Burst tube |
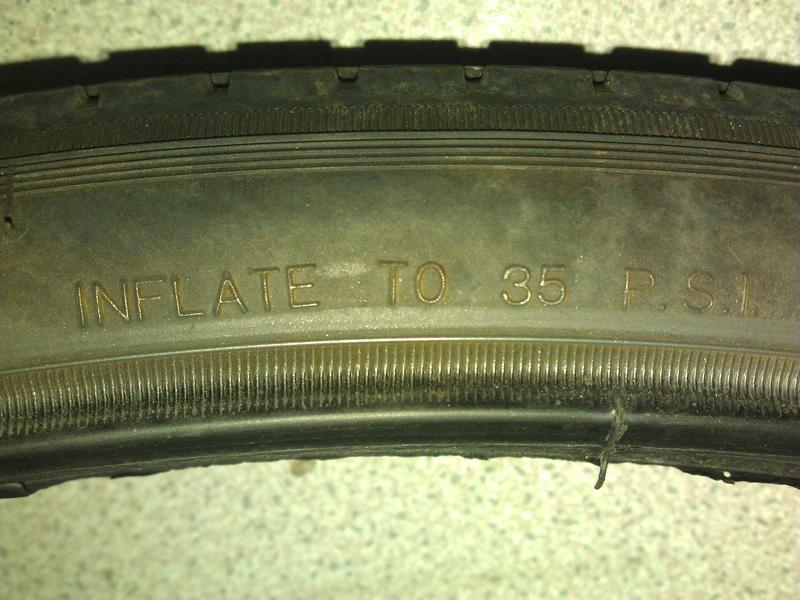 Tyre – pressure marking Tyre – pressure marking |
In summer months we are also facing the problem with temperature change that inevitably occurs when taking the bike from a cool storage, placing it in the direct sun. It is better to check the tyre pressure more often as the inner temperature can rise to unexpected levels, increasing the tyre pressure substantially. Again, we can use Gay-Lussac’s Law: p1/T1=p2/T2 , and it shows us that change from 5°C to 35°C makes the air pressure inside the tyre roughly 9% higher, e.g. from 45PSI to just over 49PSI.
When taking into account that the bike is left on direct sun and the temperature could rise twice as high, it could be easily reaching 54PSI which is still good for an average MTB that have usually range 45PSI – 60PSI. Nevertheless, it could be killing any narrow road tyre that is initially inflated to standard 120PSI because the pressure may reach 150PSI easily, the pressure that can tear a slightly compromised tyre or rim apart.
When over-inflating damaging the tyre is pretty obvious, what about the rim? Well, rim is subjected to tremendous forces that are pushing the sides apart, with the main problem being the rim wear in case of rim brakes, when the sides of the rim are getting thinner over the time. Interestingly, the basic single wall rims have better chances to survive this as the walls are usually thicker than in double wall rims.
Rim tape (missing, wrong type, badly fitted)
The rim-tape is integral part of rim/tube/tyre assembly, it protects tube from getting into contact with sharp spoke nipple edges . Very often the rim-tape is deteriorated so much that the spoke nipple edges are exposed and can cut through the tube or the rim-tape itself isn’t present at all.
Another problem arises when the wheel with single wall rim is being trued with fully inflated tyre on – turning the nipples often helps them to cut through thin rubber rim-tape and dig into the tube. The best solution is to let the tyre down before the attempt to true the wheel is made, inflating it back to the correct pressure after.
There are two types of rims each requiring different type of rim-tape. Single wall rims call for rubber tape while double wall rims are more demanding and have to be covered using strong high-pressure tape, either cloth or plastic.
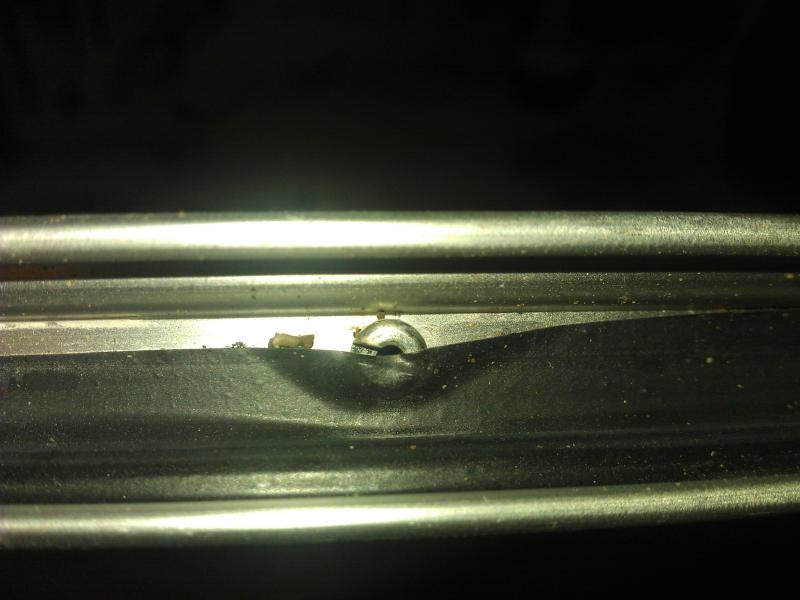 Badly fitted rim-tape (single wall rim) Badly fitted rim-tape (single wall rim) |
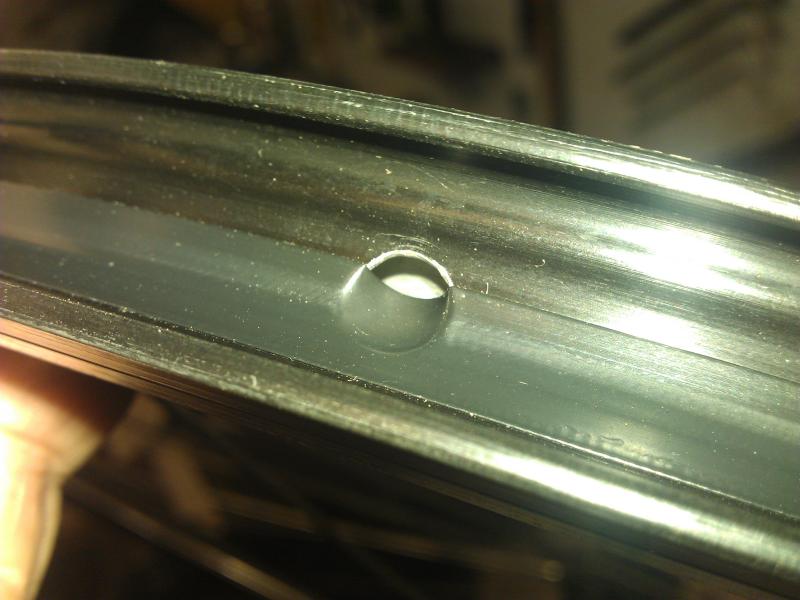 Right type but too narrow (double wall rim) Right type but too narrow (double wall rim) |
One of the most common reasons for tube damages on double wall rims comes from rubber rim-tape being fitted. Rubber is not strong enough to withstand the pressure without having support, and as the pressure rises the rim-tape is getting crowded through the holes exposing their sharp edges that will eventually tear the tube. It is common for a low quality bikes to have rubber rim-tapes fitted onto double wall rims to keep the manufacturing cost down, adversely affecting TCO as tubes + rim-tapes need replacing very soon.
Fitting rubber rim-tape onto double wall rim is like having two times thicker tube without any rim-tape, so it will not work at all. The same effect has a good, strong rim-tape that is just not wide enough to cover the holes fully.
Valve seating (seating, tyre/rim combination, chunky tyre)
Another very common problem is that valve is not seated properly. There is a thicker part around the valve (the valve base) that has to be inside the tyre but also as close to the rim as possible. The problems relevant to unseated valve are pinch-flats (when the valve base gets trapped under the tyre edge – in early stages recognizable by the tyre not seated in just where the valve is), tube bursts located approx. 5mm longitudinally from the valve base (unseated valve creates an empty space between rim beads, rim floor, valve base and valve stem in which the tube wedges and eventually bursts – very similar to tube bursts caused by wrong or missing rim-tape on double wall rims but closer to the valve base).
To get it done right I usually hold tyre towards the rim and press the valve stem towards the tyre until I feel the valve base pops pass the tyre beads, then pull the valve towards the wheel hub until the valve base is sitting tightly on the rim floor. Then I secure the position with the valve retaining nut, or hold the valve in this position until I inflate the tyre substantially to secure the valve in the desired position.
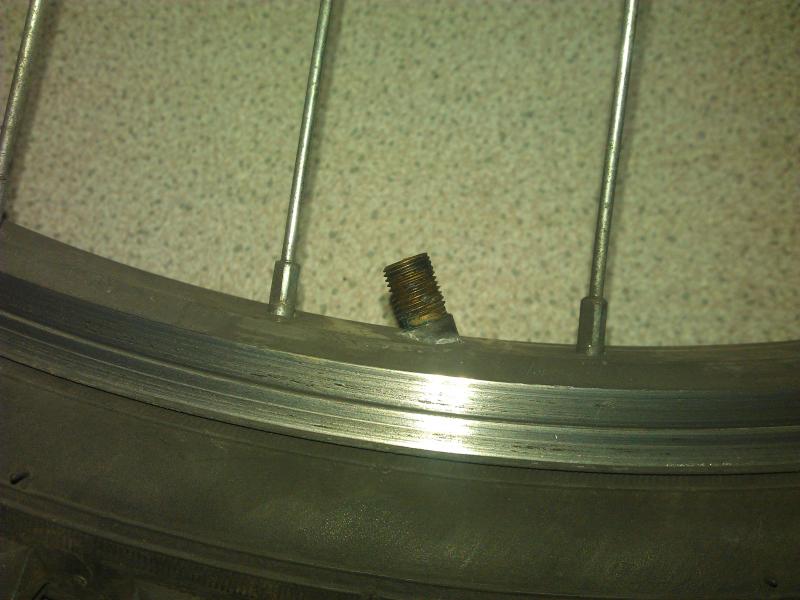 Unseated valve Unseated valve |
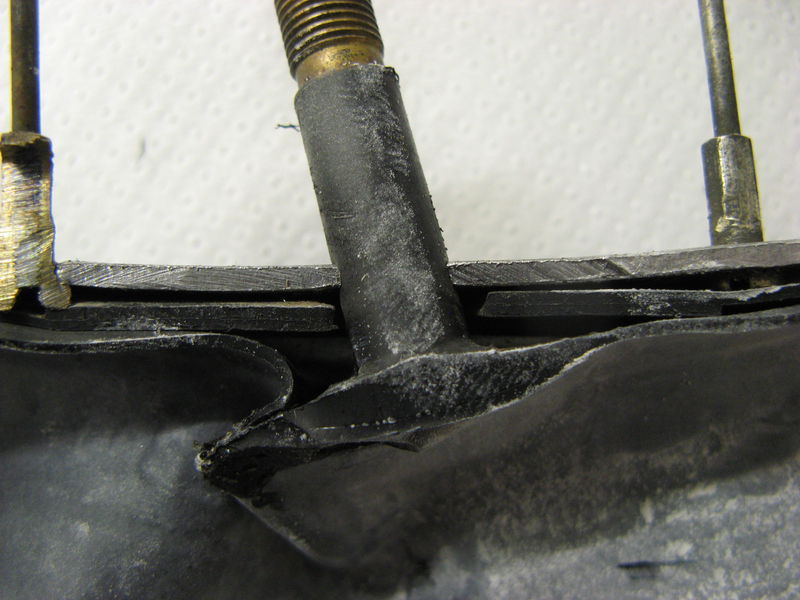 Unseated valve (cut-out) Unseated valve (cut-out) |
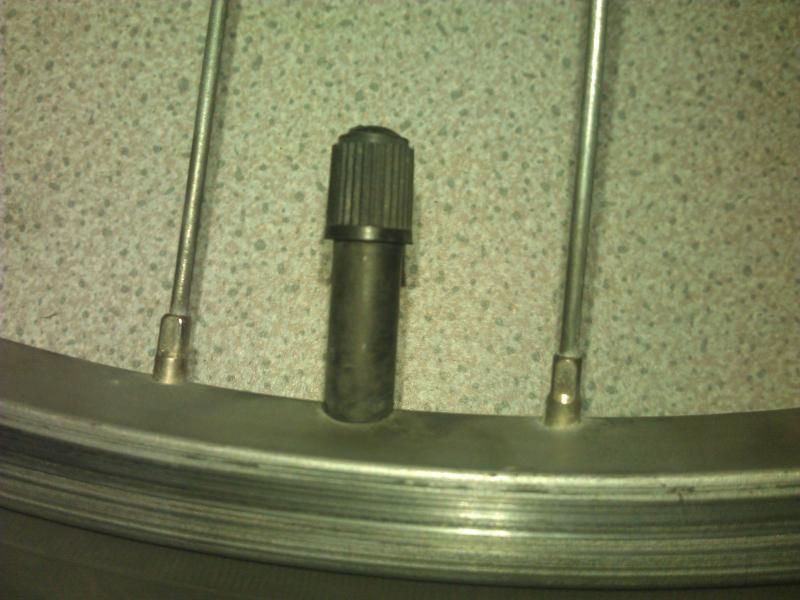 Properly seated valve Properly seated valve |
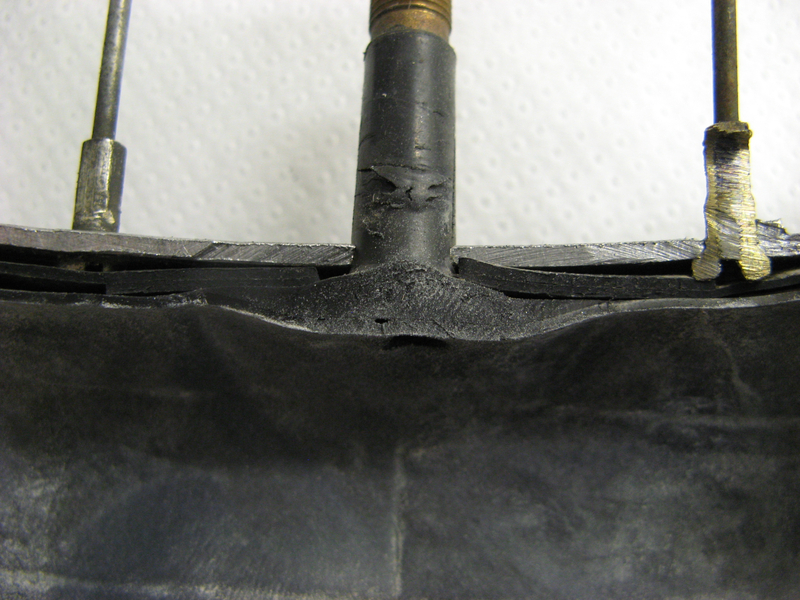 Properly seated valve (cut-out) Properly seated valve (cut-out) |
Valve types and problems
Everyone probably knows the most common valve types – Presta (French valve, Sclaverand valve, PV or F/V) and Schrader (Car valve, SV or A/V). The oldest type that is losing the popularity but can still be seen is Dunlop (Classic or D/V).
Presta valve has thin stem with roughly 6mm diameter that is made in various lengths, either threaded or plain. They can have removable cores which are of two different types:
- silver coloured with coarse thread (more common)
- gold coloured (brass) with fine thread (mainly used with tubular tyres)
The removable core is better as it can be replaced should the tip gets snapped-off, when it is faulty or otherwise damaged. It also allows using valve extenders when used with extremely deep rims and, if necessary, the tube can be easily filled with tube sealant.
Tube/tyre width issues (tube stretched too much)
There is certain room inside the inflated tyre that depends on tyre width, rim width and rim depth. In ideal case the tube is just about to fit that space when slightly inflated. Fitting tube that is too wide may lead to pinch flats as it gets trapped between rim and tyre quite easily. The opposite (and the most frequent as manufacturers supply tubes that are narrower than stated on packaging!) is to fit tube that is too narrow for the tyre/rim combination.
The tube material is not totally air-tight, it has imperfections and pores. Stretching the tube by inflating it to fill the available space makes the tube wall thinner, the pores are getting bigger and the whole tube is more susceptible to tear apart, mostly where imperfections and seams are. Getting puncture is also easier, as the rubber is stretched it works kind of the same as with party balloon – try to puncture low inflated balloon with pin or needle, and then try the same with over-inflated one.
There is also small issue when fitting tubes with tubeless rims. These rims have pronounced groove to hold the tyre bead properly in case of the air loss. The tyre needs to be forced into said groove using air pressure which works very well when fitted as intended, without the tube. In the case the tube is fitted for any reason (customer’s preference, tyre or rim are not air-tight, etc.), after properly seating the tyre the tube has to be fully deflated and re-inflated to recommended pressure again.
The reason for the above is a local over-stretching of the tube that occurs when the tyre gets into aforementioned groove. As this happens, the pressure is considerably high which means the tube is already tightly pressed onto inner surfaces of the tyre and rim. As the tyre moves into its final position, the tube gets locally overstretched and can get torn very soon. By deflating followed by re-inflating the tube wall gets uniformly distributed around.
Tyre/rim diameter issues (compatibility, manufacturing tolerances)
The tyre bead diameter (e.g. 622mm for 37-622 tyre) and the rim bead diameter (e.g. 622 for 622×22) should match closely. Nevertheless, no manufacturing process is absolutely precise and everything that is made on the Earth is made within certain tolerances. These tolerances are essential to observe whenever two parts are fitted together, bicycle parts not being excluded.
Bicycle rims are made to tolerances ±0.5mm in diameter, which means that standard hybrid rim with nominal bead diameter 622 mm could have the diameter actually between 621.5 mm and 622.5 mm. Translated into different words, total circumferential tolerance of any rim made to E.T.R.T.O. standards will be π (3.14mm), or ±1.57mm, regardless of the nominal diameter.
Tyres are made with circumferential tolerances about ±1mm depending on manufacturer, which means that marginal tolerances will be 1.57 + 1 = 2.57mm. That means the circumferential difference between tyre and rim bead diameters could be 2.57mm BOTH WAYS! You can get rim at smallest allowed diameter and tyre at greatest allowed diameter (GOOD, they will fit nicely, bit loosely though) or the biggest rim and smallest possible tyre (BAD, they will not fit at all regardless the torture) but usually you will get something in the middle.
Obviously, good manufacturers make rims in tight tolerances very close to nominal diameter, keeping it rather slightly below because when the tyre is a bit loose you can always fit thicker rim-tape covering the rim’s bead (or another one) to make it fit nicely. The above is valid for reputable manufacturers only, low standard rims and tyres will have the tolerances usually much broader. Sometimes, when very low standard comes to the scene, is not possible to push the tyre onto the rim’s bead before destroying tyre, rim or both, even when rim-tape doesn’t cover the bead and with help of soapy water that should make the tyre sliding into place easier.
Using tyre levers extensively
You can easily damage the tyre by using tyre levers too much or by forcing the tyre onto the rim. Rims are designed to let the fitting procedure run smoothly, if you experience problems there is usually something wrong and by forcing the tyre on you will not make the problem disappear.
 Damaged tyre bead Damaged tyre bead |
Maladjusted rim brakes, buckled wheel, flat spot, damaged hub, snapped spoke
Because the brake arms or calipers are fitted to the frame or forks, the distance between brake blocks and wheel axle is constant. When the rim position is changing due to wheel damages as buckled rim, damaged hub or just snapped spoke, brake blocks can rub on the tyre, causing abrasion that over time leads to severe damage of tyre cord just above the rim. Weakened tyre then permits inner tube to protrude out which will cause immediate loss of pressure. Very frequently there is a flat-spot or the wheel is not radially true (going up and down) which was not spotted by person who had adjusted the brake.
Just as a curiosity, I have seen the same damage caused by very worn rim that was about 5mm wider around its joint (due to collapsing sides), effectively pushing cantilever caliper arms into position where brake blocks were rubbing on the tyre on both sides. Customer brought the bike in after having brake blocks replaced elsewhere, requesting check-over as the brake was “too sharp”.
Apparently, old brake blocks were worn into such shape that they were effective on 1/2 of rim’s braking surface closer to the centre of the wheel, while totally ineffective on the part outside, getting shaped by the sharp edges of the rim’s joint. That configuration allowed for smooth operation while new brake blocks caused wheel blockages just where the joint was. Nevertheless, the customer kept using the bike for couple of days thinking that the problem will go away, damaging the tyre, tube and those new brake blocks in the process.
Patching bicycle tubes (badly patched)
Patching tubes is not very popular in the UK, possibly due to high labour costs. Second reason might be that it is done so sparsely that nearly nobody I met has the necessary skills. Learning how to patch the tubes reliably can save you a substantial sum of money even if you can not change the tube yourself and let your mechanic do the job. Carrying 1-2 patched tubes all the time under the saddle (carefully wrapped in strong polythene bag and sealed against elements) will cost you nearly nothing and can save your day if you, or someone else, can fit it in the field.
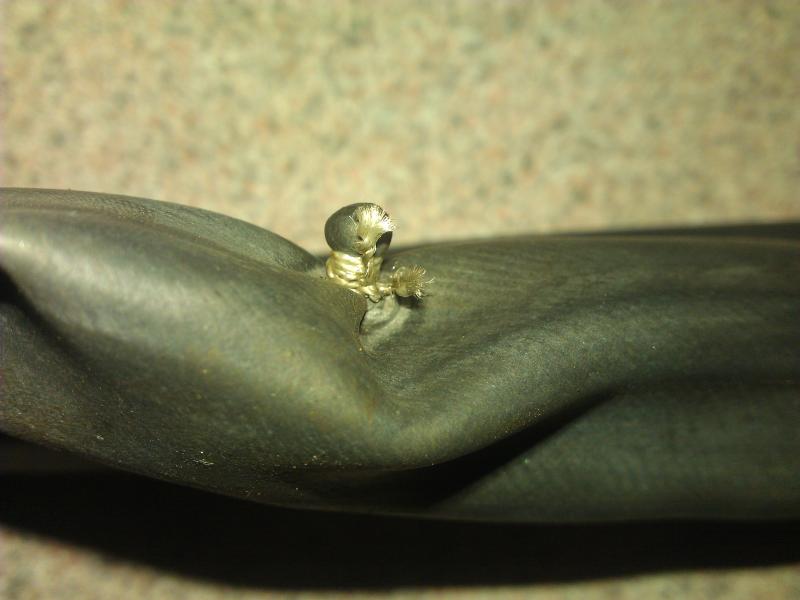 The most quaint puncture repair I have ever seen (and the most labour and skill demanding one too) The most quaint puncture repair I have ever seen (and the most labour and skill demanding one too) |
You probably would not believe if I tell you I can patch around 25 tubes in one hour, and I can guarantee that the patched spot will be more reliable than the rest of the tube, all by using standard puncture repair kit.
By the way, the standard kit is still the best option as the connection between the tube and patch is stable, not degrading over time like with those modern self-adhesive patches. Forget those, they are made for quick help in the field and the tube is supposed to be replaced as soon as you reach civilization (as the glue from self-adhesive patches permeates the tube material, tube once repaired using these patches can not be reliably fixed using the standard kit).
If you wish to know more about bicycle tyres and tubes, I can highly recommend Sheldon Brown’s Cycle Tyres and Tubes.
Source URL: https://cyclo-jan.co.uk/findings/bicycle-tyres-and-tubes/